Sunday, April 17, 2011
Windows Backup using Windows 7 Backup Software
Posted on 6:38 AM by Ashiq Hassan
Windows 7 Backup and Restore software is for backing up and restoring data which can be easily used by Windows 7 users.
Just like many other Windows 7 tools, Windows 7 Backup and Restore feature is developed for making daily tasks easier for Windows users.Windows 7 Backup software provides the user interface Windows Backup and Restore Center where you can manage to back up your data and restore data.
Although we will see in the following sections in this Windows Backup guide, Automatic File Backup feature in Windows 7 Backup and Restore utility enables you keep your backup data up-to-date and safe without your interaction each time.
Windows 7 users can backup user data which they can choose besides a system image of their computer, a copy of the drives required to run for Windows. To backup Windows system image is optional. Windows users can restore system image backup if Windows stops working to run it.
With becoming a free Windows backup tool, I think it is best Windows 7 Backup Software for many professionals as well as home users.
Windows 7 users can activate Windows 7 Backup and Restore Center from Control Panel > System and Security > Backup and Restore selections.
Or you can directly paste Control Panel\System and Security\Backup and Restore in the Windows Explorer address bar.
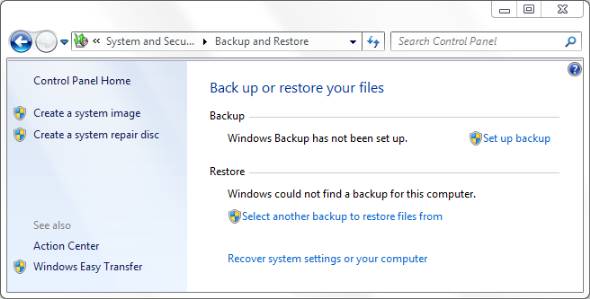
When the above Windows Backup dialog box appear on the screen, click on Set up backup command link.
This will start Windows Backup wizard, a new Windows 7 tool.
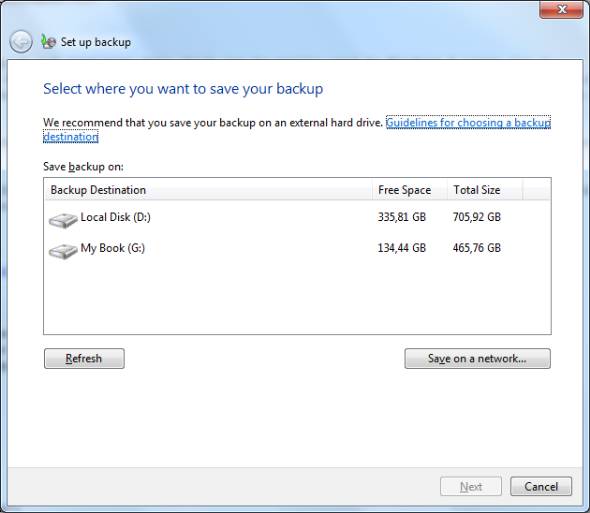
Using option on this screen, Windows 7 users can select where to save backup files.
A safe place for your Windows backup files.
As you can read easily on the wizard screen, it is recommended to save your Windows backup file on an external hard drive.
Windows 7 users are also provided a guideline for choosing a backup destination.
If you read the guideline, you will see that there is a table listing possible backup destination types and advantages and disadvantages of each backup destination.
You should have a look at this Windows backup destination guide for safety of your Windows backup files.
Windows 7 Backup software supports internal hard drives as well as external hard drives, writeable CDs or DVDs, USB flash drives and network locations as Windows 7 backup destinations.
I believe, as Windows users we all try and get the habit of using this free Windows 7 Backup program not to become sad after losing our valuable user data files.
Windows 7 Backup to a Network Location
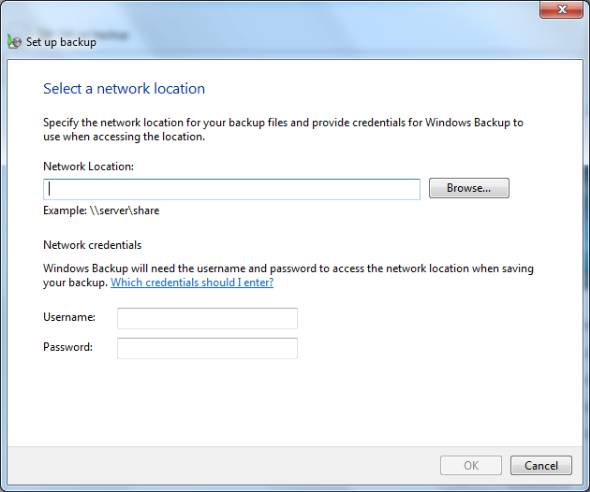
If you prefer to save your Windows backup data on a network share, press "Save on a network..." buton.
This option will open the network location selection screen as seen in the below screenshot.
In this screen, you can provide the network location for your Windows backup files and required credentials for Windows Backup tool to access the network share.
Windows 7 Backup to Internal or External Hard Drives
If you prefer to backup Windows data to an internal or external hard drive, or to a USB flash disk you can select one of the the possible Backup Destinations listed on the previous screen.With each your selection Windows 7 Backup utility might display warnings related with your selection.
For example, "A system image cannot be saved on this location." or "This drive does not have enough space to store a system image.".
Note that it is recommended to have 523,02 GB of free space for storing a system image.
Since I do not want to backup Windows system image, that warning is not a problem for me.
I want to show you how to backup user data in Windows 7 in this Windows7 guide.
I will continue to Windows Backup wizard by choosing the "My Book" external disk drive as target Windows backup destination.
After you complete your selection, click Next button for the next steps.
The next screen in the wizard is for letting Windows users to select backup data for the Windows 7 Backup process.
In this screen, users can let Windows 7 choose the data and data folders for Windows backup process.
It is also possible to choose files, folders and libraries which are important for you and you want to create backup of those data.
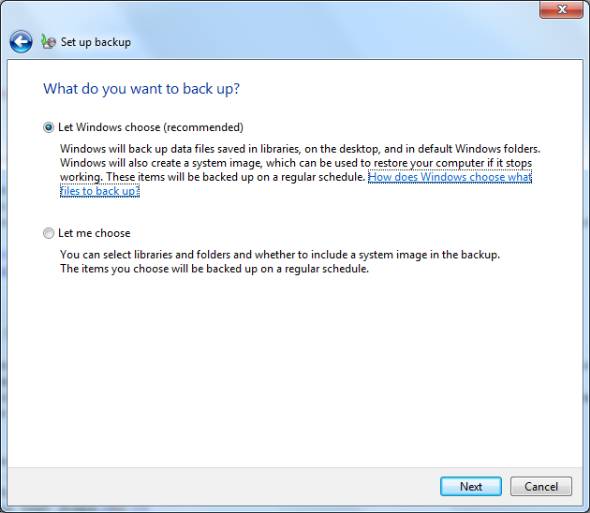
If you select the first option Let Windows choose (recommended) then Windows will back up data files save in Windows 7 libraries, on user desktop, and in default Windows folders.
With this option Windows will also create system image. You can use Windows 7 system image in case your Windows stops working by restoring the system image.
Note that this options enables a Windows backup on regular basis using a schedule.
If you choose the Let me choose option, you can select libraries and folders and also whether to include a Windows system image in the Windows Backup.
Using this option, you can define a backup schedule if you wish your data to be backed up in regular basis.
I will also make my file and folder selection for this Windows 7 backup tutorial.
After you give your decision, click on Next button for the following step in the Windows 7 Backup and Restore tool.
In the next screen, Windows users can choose what they want to back up.
By default Data Files of all defined users are included in the Windows backup file. You can configure the default selections by marking the folders or clearing the marks on the folders.
Please note if you do not want a system image of your Windows 7 OS, clear the default selection at "Include a system image of drives: Unnamed drive,(C:),(D:)".
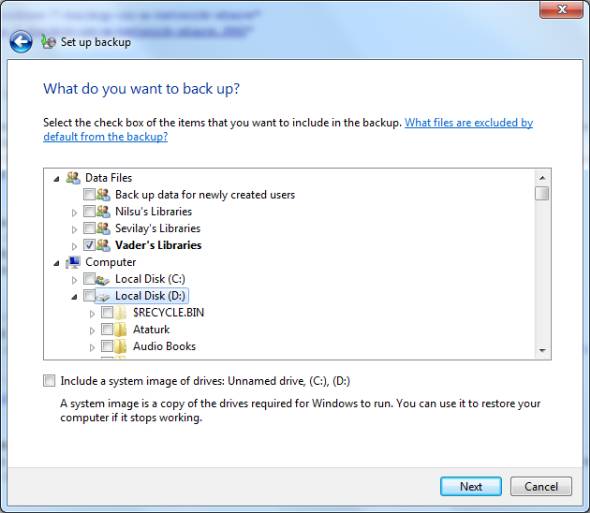
A user's libraries include : Documents Library, Music Library, Pictures Library, Videos Library and additional locations. For more information on Windows 7 Libraries please refer to guide Windows 7 Libraries: How to Create and Manage a Windows 7 Library
The additional locations include AppData folder, Contacts, user Desktop, user's Downloads folder, Favorites folder, Links folder, Saved Games and Searches folders.
You can also browse the disk drives connected in your Windows 7 PC and select data folders to backup.
After you complete the file selection task, press Next button for next step.
The next step in Windows Backup and Restore Center backup wizard is the screen where you can review Windows backup settings and selections as well as define a backup schedule which will periodically backup your data folders.
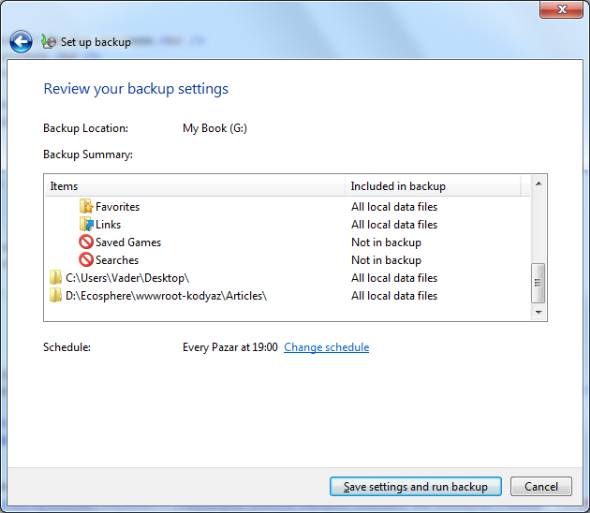
If you do not want to take Windows backup of your selected file folders, you should click on the "Change schedule" link button and clear the "Run backup on a schedule (recommended)" checkbox.
If you unmark the checkbox, then Windows 7 backup will run once for your selections.
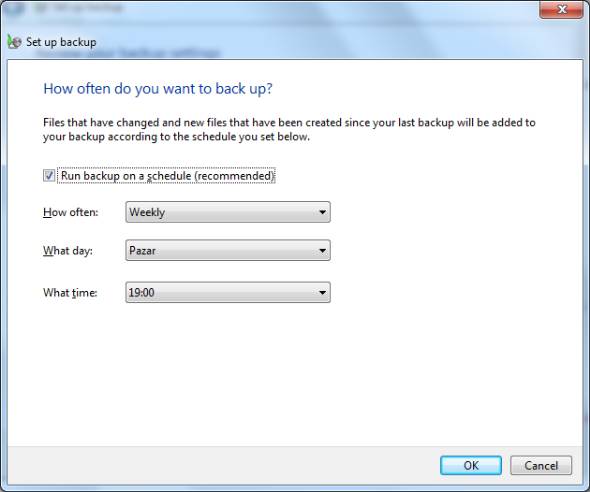
If you want to create a backup schedule, or change the default backup schedule options, you can use the frequency, day and time parameters to build a desired Windows 7 backup process.
Your options are Daily, Weekly and Monthly backup schedule options.
I must say that the backup schedule screen is not effective to define complex schedule calendars when compared with Windows 7 Task Scheduler as Windows Task Scheduling Software.
After configuration of backup scheduling options, return back to previous screen and click "Save settings and run backup" button.
When Windows Backup starts, you will see a progress bar at the top of the screen. It shows the progress taken in Windows backup task.
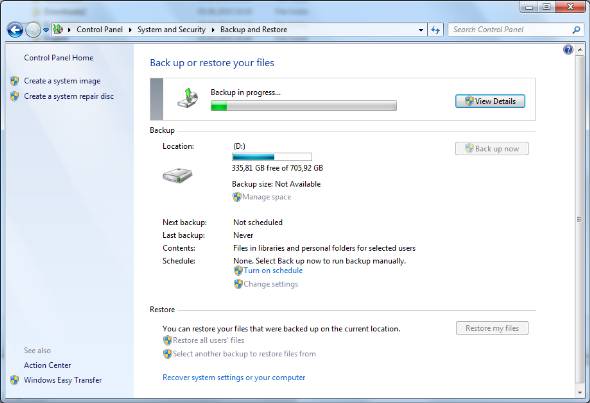
If you click the View Details button, you can see the files that are backed at that time and the progress bar indicating the status of Windows Backup task.
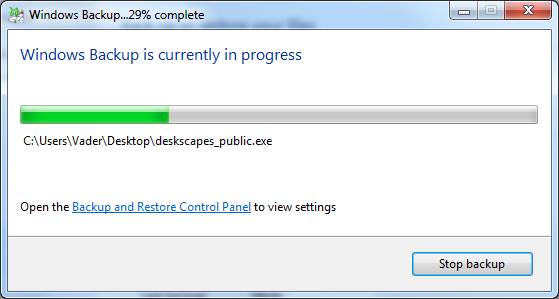
After a successful backup process, you will be informed with a message Windows Backup has completed successfully
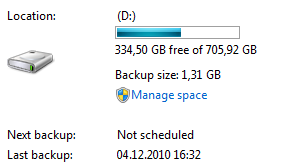
And the Backup size and the Last backup time information will be updated similar to shown in below screenshot.
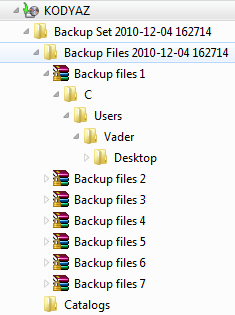
If you go and explore the target backup folder, you will see a file folder listed like below. Whenever you are asked for permissions click on Continue button to display the contents of the backup file.
To summarize, Windows 7 Backup program is a free Windows 7 tool, and it is easy to use.
Addition to all these features, using schedule to take Windows backup periodically makes it one of the best Windows 7 Backup software in my opinion.
Subscribe to:
Post Comments (Atom)
2 Response to "Windows Backup using Windows 7 Backup Software"
-

Anonymous Says....Hello! I just would like to give a huge thumbs up for the great info you have here on this post. I will be coming back to your blog for more soon.Dropshipper
-

Unknown Says....this is very useful information thanks.
Backup Software Download , Download backup tools
Leave A Reply